Showing posts with label costume replicas. Show all posts

Friday, July 29, 2016

Screwed Up Screw U

A week or two ago, I placed an order for a 3D printed replica of Holtzmann's amusingly insulting (or not, depending on who's reading it) 'Screw U' pendant.


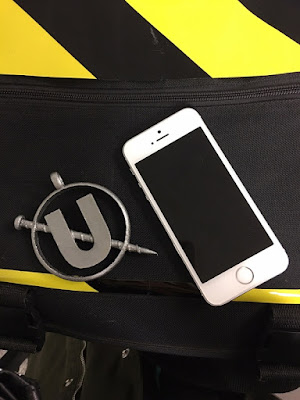
Well, it arrived in the mail yesterday....yeah, the size is a little off.


Seriously babes, it's like the Flava Flav version...


Here's the pendant after I painted it, and next to my work phone (iPhone 5). I also left a kind note about it with the folks producing these. It's not insanely big, but it's leaning toward Toon Town proportions. I'll still be using it for another top secret-for-now project ;)

I've contacted someone about making me a real one from metal, in a truer size to the original.
I'll keep you guys posted XOXO


Thursday, July 21, 2016

It's Spelled Holtzmann...

Yup, I apologize for the typos in earlier posts regarding my new favorite Ghostbuster, Dr. Jillian Holtzmann.
When I first began this journey, I only ever saw it spelled with one 'n'. I should have followed my gut and added the extra 'n'.

Anyways...a few updates to share so far; I'm planning on one of two things...
1. Buy 2 of the Red Kap fisher herringbone twill coveralls (#CC16), and bleach the crap out of both to redye them the correct khaki shade. Then I'd use one for parts to build the correct pockets and front neck closure extensions.
2. Buy some herringbone weave cotton twill, dye it, and make the coveralls myself.
I'm leaning toward the bleaching....but we'll see. I CAN sew them from scratch, but do I WANT or NEED to? Hmmmm...


I found even more accurate wire safety glasses...and by more accurate, I mean 99% the EXACT SAME model as Holtzmann's (1% difference is just the green lenses, at left) . They are Cesco 22s and in better condition than a previous pair I found (at right).
The green lenses will get replaced with yellow lenses instead of the found glasses mentioned in previous posts. So, I may have a banged-up-but-a-fun-project pair to sell because of this, and they are also the accurate Cesco 22 model used in the film. Keep an eye on this blog for any future links to auctions or Etsy.
(The lenses on those are clear, there is a bit of rust, the mesh sides are a bit bent and mis-matched slightly).


The 'Screw U' pendant. It's a thing of beautiful science humor that, I think, is lost on many.
Here is my theory: In classic Holtzmann style, it's a reference to the uranium element, with her added random bit of humor. Not only because uranium can indeed screw you, but because she's an awesome weirdo, who takes functional (albeit dangerous) things and makes them altogether better. Or in this case; science made into an honestly amusing statement to the world.
;-)
Anyways...the pendant is available to be 3D printed, and you can have these folks even print it in metal. As a cost-saver for now, I went with the black plastic that I can buff smooth and paint with metallics, until I can get the nicer version made in steel or silver.

And finally, this last one cracks me up realizing the lengths to which I go for costuming/cosplay/tribute projects. I'm still not sure if it's by chance that I stumble onto these things (as if I have a magic cosplay supply-finding magnet somewhere in my body), or if I just like a good treasure hunt, but...
I found Holtzmann's socks.
Her SOCKS, for cryin' out loud. Yes, I'm weird.
The exact pattern and brand, but they're cute!
So, as shameless as it may seem, I actually needed new socks. Seriously; my toes make a break for it in nearly every pair I currently own.
They are made by the brand 'B.ella', the style name is called 'Pamela' and you can get the sage and green polka-dot style here!
Trying to remember if she had on mis-matched socks in this scene, but it's hard to tell. It seems very Holtzmann, and I mix and match daily myself.
***Edited to add; yes she does have different socks on. I only saw it when I finally got to see the below picture in a better resolution. The other is a stripey grey pattern**
With that said; check it out, my Droogies...


P.S. I'm totally buying more of these in the various color combos they are available in.
<3 <3 <3
P.P.S. Because a few of you inquired over at this post; here is a photo of me wearing the same model of glasses Holtzmann wears in the epic battle. They are made by American Optical, and are the AO Safety Eyeglasses, size 48. I purchased them here.
***Be mindful of sizing.*** A 46 is good for smaller faces, while a 50 is good for larger/wider faces. I went with the size 48, and I have about an average width oval shape face.
I'll try to add more/better photos in the coming weeks, of the various styles I'll be working with.




Thursday, March 17, 2016

The Making Of A Ghostbuster (Cosplay)

Slowly, ever so slowly, I'm gathering the bits and pieces of this Ghostbuster cosplay like an obsessed ferret. For some reason, I decided to start with the unique eye wear collection worn by Dr. Jillian Holtzmann. The frames vary from Deco era spectacles to 1950s nerd gear, and both have the signature yellow lenses and mesh side protectors.
I don't know about you, but I think they're totally stylin'.

My first find was an antique pair that was a really close match to Holtzmann's wire rims (above photo),but a little rounder. Look closer and you'll see hers have a slight shaping to them.
Mine don't have the yellow lenses either, but I can always change those outTinting them yellow in Photoshop helped me with that for now, so I could see what they would look like.

Deco darling...


I also found another pair, pretty much exactly like hers. Same shape this time, but still no yellow lenses and in need of a little TLC. Even with these issues they were a steal at $30, and I can do the repair work myself. These would be worth having a professional switch out the glass with yellow Polycarbonate lenses:


 ...or 'Geek chic'. Both have form and function!

As for her alternate pair of glasses, the ones I'm calling 'geek chic'; those were an easier find on Ebay.
Originally I had found a similar pair that I was going to pop the lenses out of myself, and buy replacement yellows, but had a hard time finding ones that would fit. Then I stumbled on these, and they were on sale for $20. Done deal. They may even be the very same ones used in the film...we shall see if I'm right in July:


Tuesday, October 13, 2015

Dragon Con Photos - Part III

Just a few more from the talented eye and lens of Mary Anne Butler...

My Wilma Deering "Space Vampire" episode cosplay, from the TV Series Buck Rogers.

With Anders as the Vorvon...

With my replica laser pistol, created with help from Midwick Armory.

My 'Frozen' twist on Julie Newmar's 1966 Catwoman

 With my friend, Loreli Winter and her steampunk Evil Queen cosplay.

Wednesday, August 19, 2015

Quick Photo Update


Here are just a few quick progress photos as Dragon Con 2015 rushes ever closer.
My Logan's Run/Jessica 6 costume is complete!
Below is a photo of the dress before I put the narrow hem on the bottom edge. Not as annoying a process as I thought it was going to be, but since it's silk it was much easier to work with, unlike slippery synthetic versions.
I was also able to find the perfect bra and boy shorts, that match my skin tone for that nude look, to wear underneath the very minimal ensemble. This is probably my most comfortable cosplay. Ever.


The Wilma Deering costume from Buck Rogers (Episode, "Space Vampire") is coming together quite easily. The piping proved to be a bit fussy to get nicely around the corners, but I made it work.
Tonight I may even be able to finish the matching pants, and be done with it!
The small laser pistol is also coming along, and with my fiancee's help, we made a mold of the original Match-O-Matic base to create a lighter weight version. All it needs is the trigger guard, a short clear acrylic rod for the 'barrel' and some silver paint.


Laser blaster resin mold setting up, and the piping in process for the top.

Stay tuned for a few more posts. I'll see what I can fit in between now and the last few days before the event.
XOXO

Wednesday, August 12, 2015

Progress

Here are just a few shots of the accessories I have finished, and what I am building during the in-between time.

My finished Wilma Deering boots for our Buck Rogers 'Space Vampire' cosplay.


 The boots themselves were a pair of low cut black leather ankle boots I found on Ebay, then painted a bone ivory with leather paint. I found a cheap pair of similarly colored 1980s leather pants, and used the material to build the 'spats', then painted those with the same leather spray color. 3 ribbons of elastic, stitched on with a zigzag stitch, help to create the ruching at the front of the boot as it was on the originals.


I may top stitch the  edge of the boot opening, but for now they look appropriately disco/1980s.

The holster and belt went together last night, too.
It's really hard to see how the holster attached to her belt (no photos yet), so for now I just added a loop and snap combo that still looks good enough until I can make improvements later. Truthfully from what I can make out, it almost looks like one of those large binder clips with one handle removed, and the other attaching to the holster.
The 'laser pistol' will be made after taking a mold off of the below pictured Match-O-Matic lighter.
Yep, that is indeed a bottle of whiskey....used for medicinal purposes...and as a pattern weight, etc.

 
So far, so good on the Logan's Run front. I'm making quick progress of my Jessica 6 dress, and the collar made for me by Creative Thinking Studio is on it's way to me now. All it needs is the Ankh pendant I finished this past weekend, molded from Fimo clay and painted a shiny silver. I'll add more photos of the collar and Ankh once it's all put together.
I also received the large link chain belt in the mail yesterday (yay, more super disco items!), that will wrap around the upper rib cage and through the dress front panel. It was a super yellow gold, so I toned it down with a light dusting of metallic silver spray paint.


I was able to track down a low profile nude bra to wear under this sheer little number, and to mount the chain belt to. Still on the hunt for the right shade of nude hotpants/boyshorts. They are all either super pink/pale or super dark, or have really noticable trimmings or seams at the sides.

More to come. so stay tuned!


Monday, August 3, 2015

So Much Dyeing, So Little Time


Sunday was a day of dyeing, sanding and painting.
I was able to get a good chunk of work done on some otherwise time-consuming tasks on my journey to complete at least three different costumes.
Surprisingly, I was able to get my Wilma Deering spandex dyed the perfect color on what I'd consider one dip! Fortunately I didn't need to constantly adjust my dye bath a billion times before I got the color I wanted, and only had to do two swatch tests before finally submerging my fabric. Of course in the below photo, it looks crazy dark and bright, but after the rinse and drying, it's a perfect flamingo coral color.

This color; it's not just pink. I call this 'Pank!'

 Erin Gray as Colonel Wilma Deering

With that success, I knew it would be short lived.
I needed to also dye some of the bright white spandex a pale ivory shade, for the neckline and belt loop piping trim that matches her belt & boots. I had purchased some acid dye in 'Ivory Cream' from Dharma Trading Co. This is the same stuff as all the other dyes used on my fabrics so far with success.
Not this time.
Instead of a nice creamy ivory on my swatch test, it came out a pale butter yellow color. No matter how many times I diluted it to get a paler shade, it came out super yellow each time; not what I wanted at all. So, I turned to a trusty dye source for getting a pale ivory beige; black tea.
Since Nylon is a synthetic I was wary if it would take at all to this fabric, since tea is not an acid dye or like others made for synthetics. Then I remembered that I had tea stained a pair of satin slippers a warm ivory shade, and those were covered in a synthetic satin. So I thought to at least give this a shot, considering how colorfast this Nylon jumbo spandex fabric was proving itself to be.
So I brewed up a big sauce pot of very dark black tea on the stove, turned off the heat after it reached a simmer, then dropped in my 1/4 yard of white Nylon spandex.
After about 10 minutes of letting it sit and stirring occasionally, it turned the perfect shade of creamy bone ivory I wanted. Not too dull and still bright, but without the weird yellow tone. And still colorfast; it didn't completely wash out when rinsing, which is a big plus.

From stark white, to butter yellow and finally the bone ivory I wanted (top swatch).
Both fabrics, finally dry and ready to be turned into a costume.

I'm not showing full photos yet of one other project, since it's one I'm keeping it top secret for now. I will say that I had fun painting the prop a shiny metallic silver, then applying a frosty acrylic paint in raised areas. Onto this I dusted a iridescent white/blue glitter. This was done to make the object appear to have frosted over in some spots.
Here's a cropped sneak peek:


Aside from that, the progress on my Jessica 6 costume from Logan's Run is coming along nicely.
I was able to get the pale aqua blue metallic woven silk Georgette dyed the perfect cool pistachio green.
Using the same dye brand and process as before, I just added a smidgen of the Sunflower Yellow to very warm water, and stirred my silk in it for 5 minutes.


The silver threaded silk Georgette dried post dye bath; perfect!

I have an artist via Etsy working with me now, to create the wide silver tone collar that I can add the ankh pendant to myself. I'll probably make the pendant from Fimo and paint it metallic silver. If it doesn't match the metal of the collar, it's ok. The ankh pendant in the film didn't match either, and was likely made of painted resin or something similar, too. The film-worn neck collar it was attached to, however: was made by Cartier.

I've also figured out that I can take photos to document my process as I go, then write and post about it on my breaks at work during the week. This saves me valuable sewing/building time, not spent at the computer at home. We'll see how that goes as the time ticks away toward go time.
XOXO

Friday, July 31, 2015

One More To The List...


Because I'm attending Dragon Con in hot and steamy Atlanta, I've been trying to add more than a few "lightweight" costumes to my repertoire. This means whatever I can comfortably, and in some cases comically, get away with!
After seeing a random clip from the 1970s sci-fi film Logan's Run the other night, and being a Logan's Run fan for years, I've decided to recreate the Jessica 6 costume from her first scene with Logan.
It's shimmery and green, light and airy, perfect for hot humid weather. Although there seems to be a fair amount of fabric covering all the needed areas, it's still barely there.
But why, with the other costumes I need to finish am I adding this one? Because it will literally take me one evening to make the dress, and I nearly have all the other bits and pieces already. As I was entertaining the thought of doing this costume, I stumbled upon an amazingly nice wig at a great deal on Ebay. I was actually stunned by the quality when I received it in the mail the other day. Rarely is an Ebay wig nicer than the photo.
I may trim it a bit shorter, but it's almost exactly the hairstyle and color as Jessica's.
Achieving a natural looking hairstyle that is worlds away from your own cut and color, is often the most difficult and time consuming part to a cosplay. Add to that the often endless searching of wig shops and online sources for something that works. Finding a perfect wig right away cut out 90% of the time it will take to make the Jessica 6 cosplay, and I think it was a big deciding factor to just go for it.

A large gold link chain belt was found on Etsy, and I'll be using some silk Georgette I already have on-hand that has silver threads woven in. It was originally going to be the overlay on a skirt for my Queen Elsa cosplay, before I found an alternate that was better.
Currently the fabric is a pale aqua blue. So, I'll be using a pinch of Sunflower Yellow acid dye from Dharma Trading co. to get that perfect pale pistachio green. I tested a swatch yesterday afternoon, and it turned out a perfect match.


Haha! Well, let's just get right to it, shall we? Oh the 1970s...

The revealing nature of this Jessica 6 dress is all in the cut and type of fabric, with one side of the sheer frock fully open.
There may be some magic involved in either making a nude colored high cut leotard for underneath, or tracking down some great matching flesh tone microfiber (and nearly invisible) boy shorts to wear.
I'll also be adding built-in flesh tone bra cups too.
Maybe even engineering some kind of slingshot bikini? We'll see.

Also including the easiest costume ever; the Sandman caftan. One giant rectangle with grey edging that overlaps like a bathrobe in front and closes with front ties.
Yep. This is happening...because it's Atlanta, and it's a whole other level of humid and hot.

Of all the projects I'm currently trying to finish, I may be posting very few updates between now and the zero hour before Dragon Con. it all depends on how fast I can move on these projects, and what my extra online time looks like.
I will, however; be taking photos as I go, and will likely wait until everything is done and back from DC before making detailed posts about each project.
xoxo

Wednesday, July 29, 2015

Patterning Wilma Deering

Boots and belt painted, and pattern for pants and cropped top drafted.


Next on the to-do list; dye a bunch of nylon spandex coral pink, and a little nylon spandex ivory.
Stay tuned xoxo!

Thursday, June 25, 2015

A Very Long Wait In The Resurrection Tub...

Way back in early March of last year, I had discovered that the sci-fi replica costume company, Anovos was releasing a copy of the infamous red dress worn by the Cylon known as Caprica 6.
Along with this, they also created a stunning replica of her lethally sculptural bracelet and ring.


While I had already made my own replica of the dress, I still snatched up a size medium for myself.
My version of the dress was okay, but I wasn't completely satisfied with it. The fabric I was able to find didn't look or feel quite right, didn't hang or cling nicely to my body, and generally had issues with longevity.
The fabric didn't hold its shape well, and stretched out in odd areas. So, I figured this one by Anovos would definitely be a step up.
My fiance bought me the bracelet and ring set as a gift, since my birthday was only a few weeks away.
Keep in mind that I knew these items were all pre-orders and set for production, so I expected to wait the then-stated time of 5-6 months.
The bracelet arrived on time, but the dress ran into issues with fabric quality and production times slowed to a crawl. One year and 4 months later, they worked out the issues and the dress is currently in transit to me, set to arrive tomorrow. I'm really excited to finally get this sultry frock, and will post photos as soon as I have the chance to model it!

I'm crossing my fingers the quality and fit will have been worth the wait, but the jewelry set is stunning.
My only issue with it, is the clasp is complete crap. It won't stay closed, and I've nearly lost it on at least 3 occasions. The steel metal 'shards' are actually slides mounted on a faux leather (or at least plastic coated) strap. The clasp closure consists of a little tension plate you slide the end of the strap into, and flip the plate over. The underside of the plate has small 'teeth' that are supposed to grip the strap. It does not, and instead flips back open on its own within seconds.
Well, it stays put if you don't move...or breathe for that matter.
This makes me afraid to wear it most times, when it's a piece of gorgeous jewelry I want to wear as often as possible. I'm hoping to replace the clasp with something more secure, like an actual buckle.

Now I just need a better wig, since I'm not about to chop and bleach my hair to death.
XOXOX!